If you’re searching for how to fix missing HTTP Security Headers in WordPress, you’ve come to the right place.
After scanning your website with SecurityHeaders.com, you may receive an F, D, or C grade because important HTTP Security Headers are missing. While this can look alarming, it doesn’t necessarily mean your website has been hacked or infected with malware. In most cases, it simply means your web server isn’t sending the security headers that modern browsers expect.
HTTP Security Headers are small but powerful response headers that help protect your website against common attacks such as Clickjacking, Cross-Site Scripting (XSS), MIME Sniffing, and insecure HTTP connections. They act as security instructions for browsers, reducing potential vulnerabilities and improving your website’s overall security posture.
The good news is that fixing these issues is easier than you might think. Whether your WordPress website is running on Apache, Nginx, protected by Cloudflare, or hosted on a shared server, you can configure the required security headers in just a few steps.
In this complete beginner-friendly guide, you’ll learn how to fix missing HTTP Security Headers in WordPress using four proven methods: Cloudflare, Apache (.htaccess), Nginx, and WordPress plugins. I’ll also explain what each security header does, why it matters, common mistakes to avoid, and how to verify your configuration after making changes.
By the end of this guide, you’ll know exactly how to fix missing HTTP Security Headers in WordPress, strengthen your website’s security, and, in most cases, improve your SecurityHeaders.com score from F to A without affecting your website’s functionality.
What Are HTTP Security Headers?
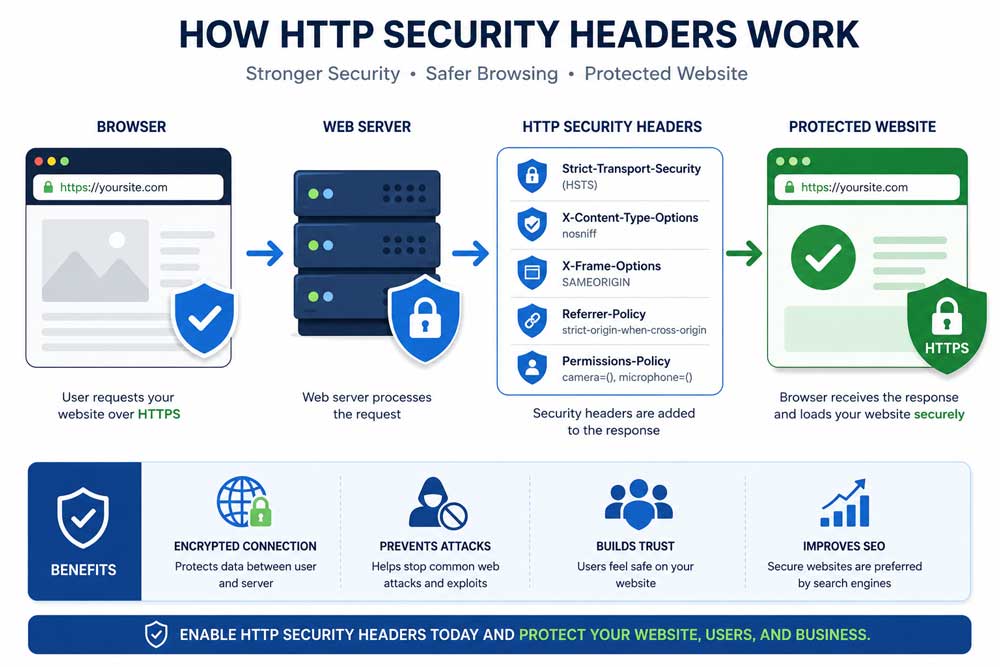
HTTP Security Headers are special instructions sent by your web server to a visitor’s browser every time someone loads your website.
Think of them as security rules that tell the browser how it should handle your website’s content. Instead of trusting every file, script, or embedded resource automatically, the browser follows these rules to reduce the risk of common attacks.
For example, a security header can instruct the browser to:
- Always use an encrypted HTTPS connection.
- Prevent your website from being embedded inside malicious websites.
- Block suspicious scripts from executing.
- Stop browsers from guessing file types.
- Reduce the amount of information shared with third-party websites.
- Restrict access to sensitive browser features such as the camera or microphone.
These protections happen in the visitor’s browser before many attacks have a chance to succeed.
Why Are HTTP Security Headers Important?
Many website owners assume that installing an SSL certificate is enough to secure a website. While HTTPS is essential, it only encrypts data in transit. It does not instruct browsers on how to securely process your website’s content.
This is where HTTP Security Headers become important.
When properly configured, they provide an additional layer of defense against several common web attacks.
Without Security Headers
- Your website may receive an F grade on SecurityHeaders.com.
- Browsers receive fewer security instructions.
- Attackers may have more opportunities to exploit browser behavior.
- Sensitive referral information can be exposed.
- Your site becomes more vulnerable to Clickjacking and MIME sniffing attacks.
With Proper Security Headers
- Stronger browser-level protection.
- Better compliance with modern security best practices.
- Improved trust for visitors.
- Better SecurityHeaders.com score.
- Reduced attack surface.
Although security headers are not a direct Google ranking factor, they are considered an important part of maintaining a secure and professionally configured website.
Comparison Table
| Without Security Headers | With Security Headers |
|---|---|
| Lower browser protection | Better browser protection |
| Possible F Grade | A or A+ Grade |
| Higher security risks | Reduced attack surface |
| More vulnerable to Clickjacking | Better Clickjacking protection |
| Less secure browser behavior | Modern browser security standards |
Real-World Example
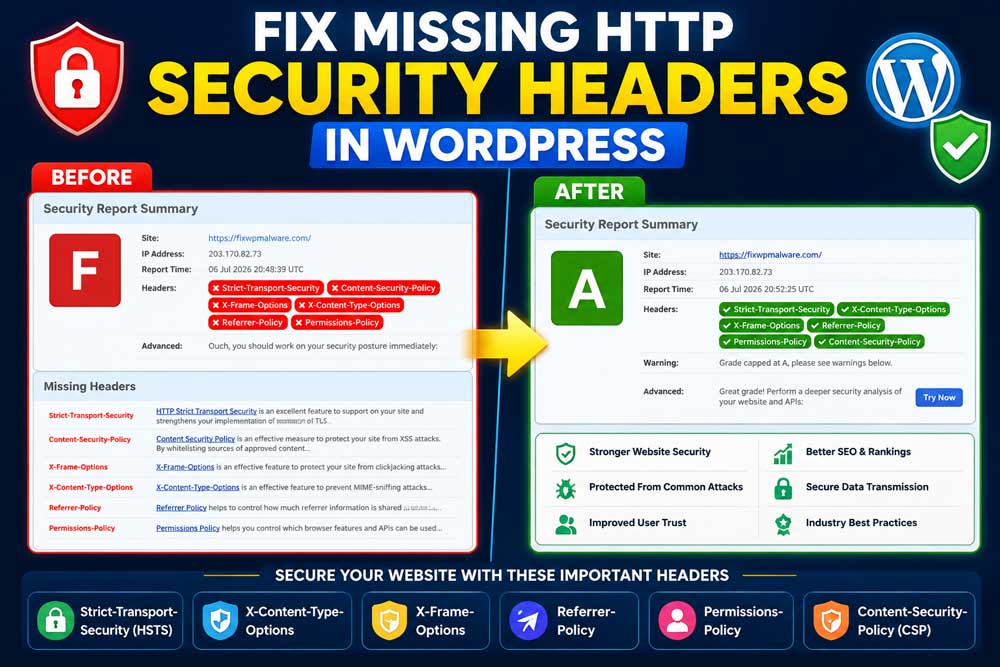
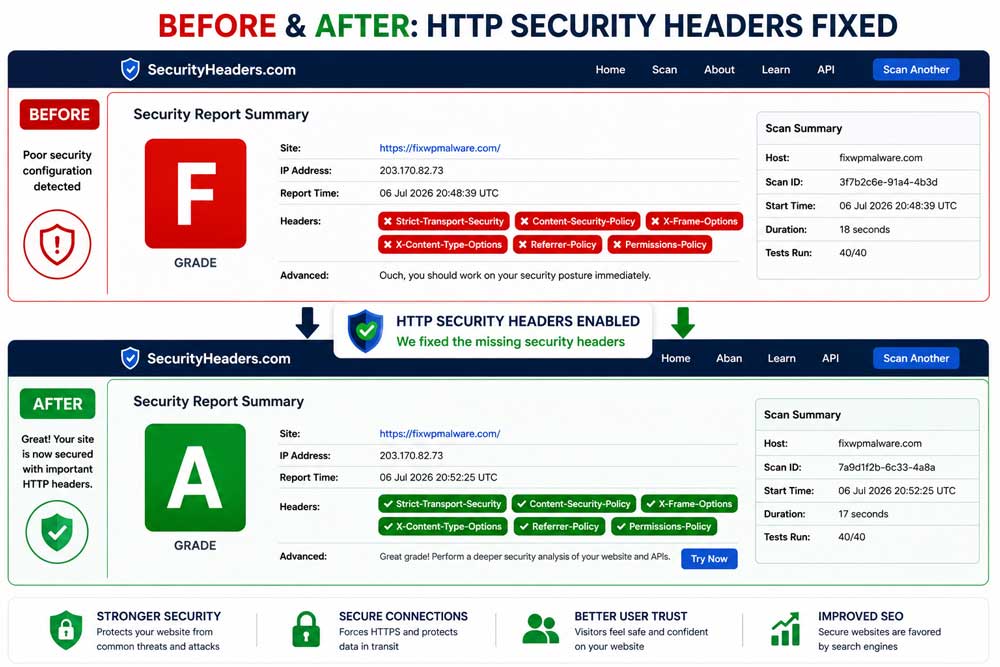
Recently, I audited one of my own WordPress websites using SecurityHeaders.com. The initial scan returned an F grade because none of the recommended HTTP Security Headers were configured.
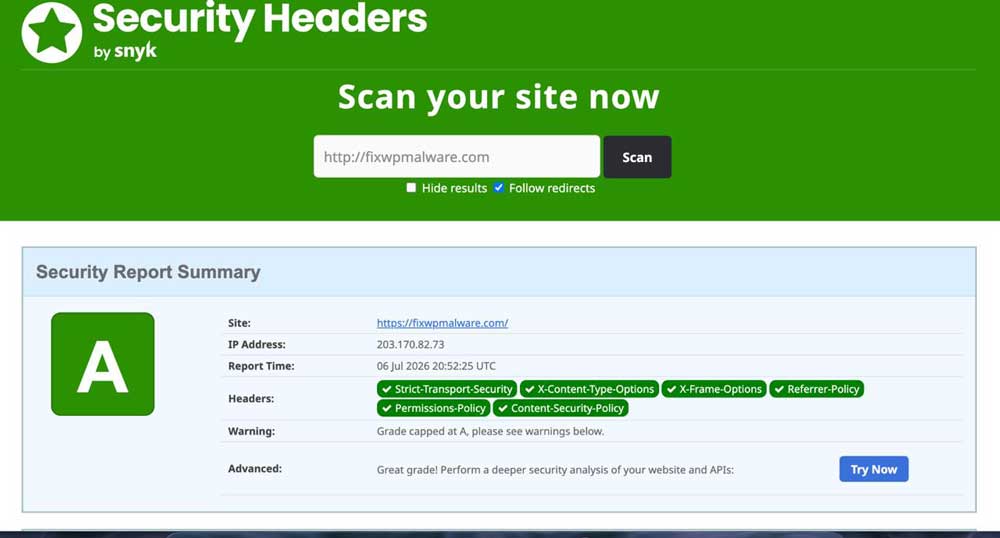
After adding the required headers through the server configuration, I rescanned the website and achieved an A grade without affecting the site’s functionality.
This demonstrates that improving your website’s security posture often requires only a few carefully configured response headers rather than major changes to your website itself.
Step 1: Check Your Website’s Security Headers
Before making any changes, the first step is to identify which HTTP Security Headers are missing from your website. Without testing, you’ll have no way of knowing which headers need to be added or whether your changes are working correctly.
The easiest way to do this is by using SecurityHeaders.com. This free online tool scans your website and analyzes the HTTP response headers sent by your server. Within a few seconds, it generates a security grade ranging from F to A+ and highlights any missing or misconfigured headers.
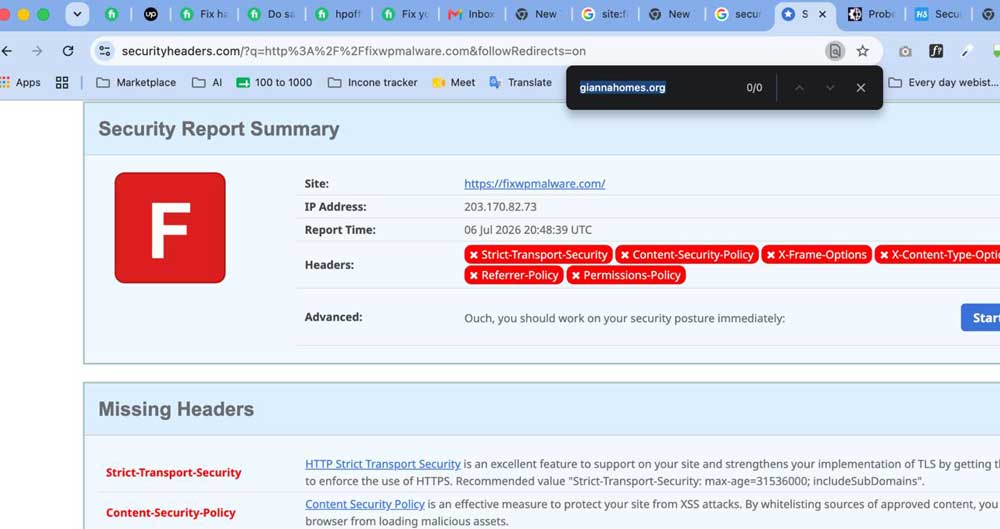
A poor score doesn’t necessarily mean your website has been hacked. In many cases, an F grade simply indicates that your server isn’t sending modern security headers such as Strict-Transport-Security, X-Frame-Options, or Referrer-Policy.
Once you know which headers are missing, you can choose the best method to implement them—whether through Cloudflare, Apache, Nginx, or a WordPress plugin.
💡 Pro Tip
Always scan your website before making any changes and again after implementing security headers. This allows you to verify that the new headers are being sent correctly and helps you identify configuration issues early.
Step 2: Fix Missing HTTP Security Headers Using Cloudflare
If your website uses Cloudflare, this is the easiest and most recommended method.
Instead of modifying server files or editing your .htaccess configuration, Cloudflare allows you to inject HTTP Security Headers directly from its dashboard. Since Cloudflare sits in front of your origin server, it can add these headers to every response before it reaches your visitors.
This approach is especially useful because:
- No server configuration changes are required.
- Works with Apache, LiteSpeed, and Nginx.
- Easy to update or remove headers later.
- Reduces the risk of accidental server misconfiguration.
For many WordPress websites, Cloudflare is the simplest way to improve browser security without installing additional plugins.

Step 2.1: Log in to Your Cloudflare Dashboard
Sign in to your Cloudflare account and select the website you want to secure.
From the left sidebar, navigate to:
Rules → Transform Rules → HTTP Response Header Modification
This section allows you to create custom response headers that Cloudflare will send with every request.
Step 2.2: Add the Recommended Security Headers
Create a new response header rule for each of the following.
1. Strict-Transport-Security (HSTS)
Header Name
Strict-Transport-SecurityValue
max-age=31536000; includeSubDomains; preloadWhat it does
This header forces browsers to use HTTPS instead of HTTP. It protects visitors from protocol downgrade attacks and ensures encrypted connections are always used.
⚠️ Important: Only enable HSTS if your entire website—including all subdomains—is accessible over HTTPS.
2. X-Content-Type-Options
Header Name
X-Content-Type-OptionsnosniffWhat it does
This prevents browsers from guessing the content type of files. It reduces the risk of malicious files being interpreted incorrectly.
3. X-Frame-Options
Header Name
X-Frame-OptionsSAMEORIGINWhat it does
This protects your website from Clickjacking attacks by preventing other websites from embedding your pages inside iframes.
4. Referrer-Policy
Header Name
Referrer-Policystrict-origin-when-cross-originWhat it does
This controls how much referral information is shared when users click links from your website to another site, helping to reduce unnecessary data exposure.
5. Permissions-Policy
Header Name
Permissions-Policygeolocation=(), microphone=(), camera=()What it does
This restricts access to sensitive browser features such as location, microphone, and camera unless explicitly allowed.
⚠️ Should You Add a Content Security Policy (CSP)?
Many website owners immediately add a Content Security Policy (CSP) after seeing it recommended in security reports.
However, be careful.
A poorly configured CSP can break your website by blocking legitimate scripts, fonts, images, or third-party services.
For example, an incorrect CSP may affect:
- Elementor Editor
- WooCommerce Checkout
- Google Fonts
- Google Maps
- Google Analytics
- YouTube Embeds
- Facebook Pixel
- Live Chat Widgets
If you’re new to CSP, it’s usually better to implement the five safe headers above first. Once you’ve confirmed that everything works correctly, you can create a custom CSP tailored to your website’s specific requirements.
Step 2.3: Save Your Changes
After adding the required headers, save your Cloudflare rule and wait a few minutes for the changes to propagate.
Next:
- Clear your website cache.
- Purge the Cloudflare cache.
- Refresh your browser.
- Scan your website again using SecurityHeaders.com.
If everything is configured correctly, your website should receive a significantly improved security grade.
💡 Pro Tip
If you use Cloudflare, there’s usually no need to install a separate WordPress plugin just to add HTTP Security Headers. Managing them at the edge through Cloudflare is cleaner, easier to maintain, and reduces the number of plugins running on your website.
Step 3: Fix Missing HTTP Security Headers Using Apache (.htaccess)
If your website is hosted on Apache or LiteSpeed (such as Hostinger, Namecheap, GoDaddy, SiteGround, A2 Hosting, or most cPanel hosting providers), the easiest way to add HTTP Security Headers is by editing your .htaccess file.
Unlike Cloudflare, this method applies the headers directly from your web server. Every visitor receives the security headers before the page is loaded, making it one of the most reliable ways to improve your website’s browser security.
The good news is that you don’t need to install any plugins or modify WordPress itself. A few lines of configuration inside your .htaccess file are usually enough.
Before You Start
Before editing your .htaccess file, keep these best practices in mind:
- Create a backup of your existing
.htaccessfile. - Ensure your website is already using HTTPS.
- Clear any caching plugins after making changes.
- If you’re using Cloudflare, purge the Cloudflare cache as well.
Even though the changes are simple, having a backup allows you to restore your website quickly if something goes wrong.
💡 Pro Tip
Most hosting providers allow you to restore a backup directly from cPanel or their backup manager. If you’re unsure, download a copy of the .htaccess file before editing it.
Where Is the .htaccess File Located?
For most WordPress installations, you’ll find the file here:
public_html/.htaccess- Open cPanel
- Go to File Manager
- Click Settings
- Enable Show Hidden Files (dotfiles)
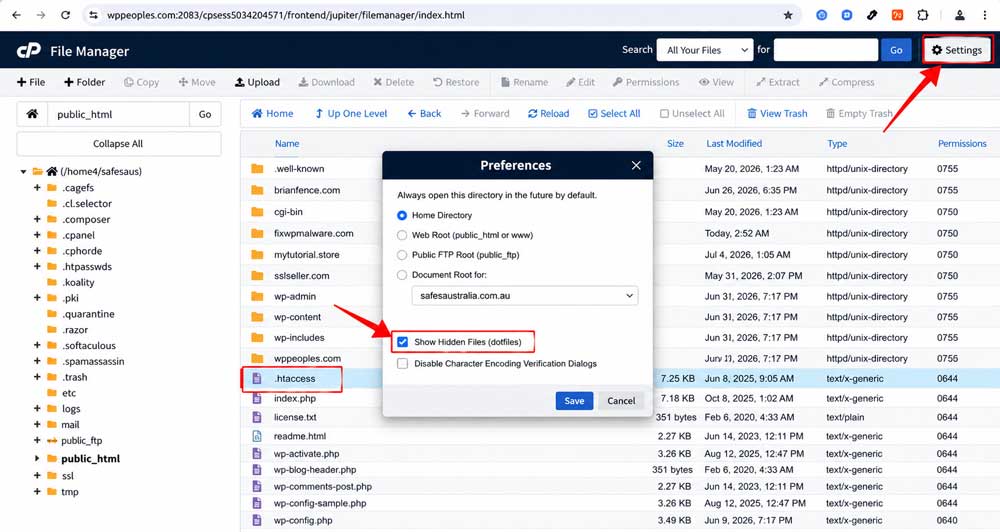
The .htaccess file is hidden by default because its name starts with a dot (.).
Where Should You Add the Code?
One of the most common mistakes is placing the code in the wrong location.
Always insert your Security Headers before the following section:
# ===========================
# Security Headers
# ===========================

<IfModule mod_headers.c>

    # HSTS (HTTPS Only)
    Header always set Strict-Transport-Security "max-age=31536000; includeSubDomains; preload"

    # Prevent MIME Type Sniffing
    Header always set X-Content-Type-Options "nosniff"

    # Clickjacking Protection
    Header always set X-Frame-Options "SAMEORIGIN"

    # Referrer Policy
    Header always set Referrer-Policy "strict-origin-when-cross-origin"

    # Permissions Policy
    Header always set Permissions-Policy "accelerometer=(), autoplay=(), camera=(), geolocation=(), gyroscope=(), magnetometer=(), microphone=(), payment=(), usb=()"

    # Basic Content Security Policy
    Header always set Content-Security-Policy "default-src 'self' https: data: blob:; script-src 'self' 'unsafe-inline' 'unsafe-eval' https:; style-src 'self' 'unsafe-inline' https:; img-src 'self' data: https: blob:; font-src 'self' data: https:; connect-src 'self' https:; frame-src 'self' https:; object-src 'none'; base-uri 'self'; form-action 'self';"

</IfModule>

# Hide Server Signature
ServerSignature Off
⚠️ Common Mistake
Don’t add your code inside the WordPress rewrite rules.
WordPress may overwrite those rules when updating permalink settings.
What Does This Code Do?
Let’s understand each header individually.
Strict-Transport-Security
max-age=31536000; includeSubDomains; preloadBenefits:
- Prevents HTTPS downgrade attacks
- Protects login sessions
- Improves browser security
X-Content-Type-Options
nosniffInstead of trying to “figure out” whether a file is JavaScript or HTML, the browser follows the correct Content-Type sent by the server.
X-Frame-Options
SAMEORIGINOnly pages from your own domain are allowed to load your website inside an iframe.
Referrer-Policy
strict-origin-when-cross-originIt helps reduce unnecessary exposure of URLs while maintaining useful analytics data.
Permissions-Policy
geolocation=(), microphone=(), camera=()This blocks websites from requesting access to sensitive browser features unless explicitly allowed.
Should You Add Content Security Policy Here?
Technically, yes.
Practically, not always.
A generic Content Security Policy can easily break a WordPress website.
For example, it may stop:
- Elementor Editor
- WooCommerce Checkout
- Google Fonts
- Google Maps
- reCAPTCHA
- Stripe Payments
- PayPal Buttons
- Facebook Pixel
- Google Analytics
Because every website loads different third-party resources, CSP should be customized based on your site’s requirements.
Save the File
After adding the headers:
- Save the
.htaccessfile. - Clear your WordPress cache.
- Clear your hosting cache.
- Purge the Cloudflare cache (if applicable).
- Open your website in a private browser window.
If everything loads normally, proceed to the next step.
Verify Your Changes
Visit SecurityHeaders.com again and scan your website.
You should notice a significantly improved score.
For many websites, simply adding these five safe headers is enough to improve the grade from F to A.
💡 Pro Tip
If your website already uses Cloudflare Response Header Rules, avoid configuring the same headers again in .htaccess.
Duplicate headers won’t usually break your website, but they can make troubleshooting more difficult and may result in multiple values being sent in the HTTP response.
⚠️ Common Mistakes
Avoid these common errors when configuring Apache Security Headers:
- Editing the wrong .htaccess file.
- Forgetting to back up the original file.
- Enabling HSTS before HTTPS is fully configured.
- Copying a random Content Security Policy from another website.
- Forgetting to clear caches after making changes.
- Ignoring browser console errors after enabling CSP.
Step 6: Understanding Every HTTP Security Header (Complete Beginner’s Guide)
By now, you’ve learned how to add HTTP Security Headers using Cloudflare, Apache, Nginx, and WordPress plugins. However, simply copying configuration examples isn’t enough. To build a secure WordPress website, it’s important to understand what each security header actually does and when you should use it.
Think of HTTP Security Headers as instructions your server sends to a visitor’s browser. These instructions help the browser make safer decisions when rendering your website. Instead of blindly trusting every resource, the browser follows these security rules to reduce the risk of common web attacks.
Let’s look at each header individually.
Frequently Asked Questions (FAQ)
1. What Are HTTP Security Headers?
HTTP Security Headers are response headers sent by your web server to a visitor’s browser. They instruct the browser on how to securely handle your website, helping protect against attacks such as Clickjacking, Cross-Site Scripting (XSS), MIME Sniffing, and insecure HTTP connections.
2. How Can I Check My Website’s Security Headers?
The easiest way is to scan your website using SecurityHeaders.com. The tool analyzes your HTTP response headers and assigns a security grade from F to A+, making it easy to identify missing or misconfigured headers.
3. Which HTTP Security Headers Are Most Important?
For most WordPress websites, start with these five safe headers:
- Strict-Transport-Security (HSTS)
- X-Content-Type-Options
- X-Frame-Options
- Referrer-Policy
- Permissions-Policy
These provide strong browser-level protection and are generally safe for most websites.
4. Should I Enable Content Security Policy (CSP)?
Only if you understand how it works.
A properly configured Content Security Policy offers excellent protection against Cross-Site Scripting (XSS) attacks. However, an incorrect CSP can break your website by blocking legitimate resources such as Google Fonts, Google Maps, Elementor, WooCommerce, or third-party scripts.
5. Is an A+ Grade Necessary?
No.
An A grade already indicates that your website is following modern security best practices. Achieving an A+ may require additional headers or stricter policies, which are not always necessary and can sometimes introduce compatibility issues.
For most websites, A is an excellent result.
6. Do HTTP Security Headers Improve SEO?
Not directly.
Google has never confirmed HTTP Security Headers as a direct ranking factor. However, they contribute to a more secure website, which improves user trust, reduces certain security risks, and supports overall technical SEO best practices.
7. Can HTTP Security Headers Slow Down My Website?
No.
These headers are simply small pieces of information sent with each HTTP response. They do not add meaningful load time or affect website performance.
Final Security Checklist
Before considering your work complete, review this checklist:
- HTTPS is enabled across the entire website.
- SSL certificate is valid and up to date.
- Strict-Transport-Security is configured correctly.
- X-Content-Type-Options is enabled.
- X-Frame-Options is enabled.
- Referrer-Policy is configured.
- Permissions-Policy is configured.
- Content Security Policy (if used) has been thoroughly tested.
- All caches have been cleared.
- Cloudflare cache has been purged (if applicable).
- The website has been rescanned using SecurityHeaders.com.
Completing this checklist will help ensure your security headers are correctly implemented.
Recommended Security Tools
These free tools can help you verify your website’s security configuration:
| Tool | Purpose |
|---|---|
| SecurityHeaders.com | Check HTTP Security Headers |
| SSL Labs SSL Test | Analyze your SSL/TLS configuration |
| Mozilla Observatory | Evaluate website security best practices |
| Google PageSpeed Insights | Measure website performance |
| Google Search Console | Monitor indexing and security issues |
Common Mistakes to Avoid
Even after following this guide, many website owners make small mistakes that reduce the effectiveness of their security configuration.
Avoid these common issues:
- Configuring the same headers in multiple places (Cloudflare, Apache, and plugins simultaneously).
- Forgetting to clear caches after making changes.
- Copying a generic Content Security Policy without testing.
- Ignoring browser console errors.
- Enabling HSTS before HTTPS is fully configured.
- Not rescanning the website after applying changes.
Conclusion
Implementing HTTP Security Headers is one of the simplest yet most effective ways to improve your WordPress website’s security.
Whether you choose Cloudflare, Apache, Nginx, or a WordPress plugin, the goal is the same: instruct modern browsers to handle your website more securely and reduce exposure to common web attacks.
If you’re just getting started, begin with the five safe headers:
- Strict-Transport-Security
- X-Content-Type-Options
- X-Frame-Options
- Referrer-Policy
- Permissions-Policy
After confirming everything works correctly, you can consider implementing a carefully planned Content Security Policy tailored to your website.
Remember, website security isn’t something you configure once and forget. Regular updates, periodic security scans, and routine maintenance are essential for keeping your WordPress site protected over time.
By following the steps in this guide, you’ll not only improve your website’s security posture but also demonstrate that your site follows modern web security best practices.